After a long wait, conditions are finally favorable for transplanting all of those seedlings I've been nurturing for two months.

This tomato plant (hiding behind garlic leaves) is one I transplanted into a tub before the last freeze. I covered the containers with a plastic tent and most of the tomatoes did fine, but this one had frost damage. I will have to replace it with a healthy seedling from the greenhouse. Fortunately I have plenty. It's hard for me to just pull up and toss a plant, even a damaged one, but I can't spare space for an unhealthy seedling. I still might transplant it into an out of the way place and give it a chance to have a life.

This is a Homestead tomato I transplanted several days ago. It is healthy and appears to be recovering from its move to the garden. Homestead is a determinate variety of tomato. They grow about four to six feet tall and ripen most of their fruit at once. They are ideal for canning and making sauce, and they produce well in a hot environment. Tomato cages work well for determinate varieties, whereas indeterminate varieties tend to grow too tall and heavy for most garden center cages.


For transplanting starts, a good hand trowel is the best tool. I bought this Corona trowel over twenty years ago and it seems indestructible. Cheaper trowels have only lasted me one or two years.


I dig a hole a bit larger around than the nursery pot my plant is in, and twice the depth. I add a 50/50 mix of bone meal and organic plant food to the bottom of the hole and mix it into two or three inches of soil.


After mixing, I add one or two inches of soil as a buffer between the raw fertilizers and the roots of the plant.

This tiny houseplant spade works well for loosening around the inside edge of the pot. It is essential for removing plants from small six pack pots.
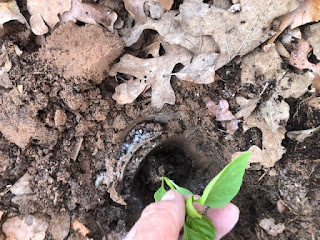
The next step takes special care. When removing a start from the pot, I hold the stem of the plant between my index and middle fingers, turn the pot over and gently shake the plant free of the container. If the plant is fairly root bound, I turn the root ball gently into the prepared hole. If, as with this plant, I have only a few roots and much of the soil breaks loose, I hold the plant gently by the stem, positioning it at the correct depth and begin to carefully fill in with dirt removed from the hole. The most important part of the process is taking care not to disturb the roots any more than can't be helped.

Next I gently tamp the soil around the plant and place the plant marker near the plant. Relying on memory just hasn't worked out for me. In a few days I will water again and feed with diluted fish emulsion. Several weeks from now I will feed again with a balanced diluted liquid plant food.
I have an entire thirty foot long row of bell peppers and I'm tucking hot pepper plants between tomatoes and rows of onions and anywhere else I can find space.
Stephen

This tomato plant (hiding behind garlic leaves) is one I transplanted into a tub before the last freeze. I covered the containers with a plastic tent and most of the tomatoes did fine, but this one had frost damage. I will have to replace it with a healthy seedling from the greenhouse. Fortunately I have plenty. It's hard for me to just pull up and toss a plant, even a damaged one, but I can't spare space for an unhealthy seedling. I still might transplant it into an out of the way place and give it a chance to have a life.
This is a Homestead tomato I transplanted several days ago. It is healthy and appears to be recovering from its move to the garden. Homestead is a determinate variety of tomato. They grow about four to six feet tall and ripen most of their fruit at once. They are ideal for canning and making sauce, and they produce well in a hot environment. Tomato cages work well for determinate varieties, whereas indeterminate varieties tend to grow too tall and heavy for most garden center cages.
The row furthest from the camera is determinate plants, mostly Roma, and what support they need will be supplied by the fence and some garden twine. The next row, indeterminate plants and mostly Beefsteak and Creole, will be supported by a scavenged piece of cattle panel held up by T-posts driven into the ground. The next row is a mix of determinate and indeterminate. Temporarily, they will be supported by scavenged tool handles driven into the ground, with a taller means to be added later. There are two more rows of mixed plants that will also be on makeshift frames.
Two days after transplanting, these tomato plants are doing well.
These Keystone bell pepper plants are looking good two days after transplanting. They won't get very tall, but they will be weighed down by large peppers and will need sturdy supports.
I dig a hole a bit larger around than the nursery pot my plant is in, and twice the depth. I add a 50/50 mix of bone meal and organic plant food to the bottom of the hole and mix it into two or three inches of soil.
This tiny houseplant spade works well for loosening around the inside edge of the pot. It is essential for removing plants from small six pack pots.
The next step takes special care. When removing a start from the pot, I hold the stem of the plant between my index and middle fingers, turn the pot over and gently shake the plant free of the container. If the plant is fairly root bound, I turn the root ball gently into the prepared hole. If, as with this plant, I have only a few roots and much of the soil breaks loose, I hold the plant gently by the stem, positioning it at the correct depth and begin to carefully fill in with dirt removed from the hole. The most important part of the process is taking care not to disturb the roots any more than can't be helped.
Next I gently tamp the soil around the plant and place the plant marker near the plant. Relying on memory just hasn't worked out for me. In a few days I will water again and feed with diluted fish emulsion. Several weeks from now I will feed again with a balanced diluted liquid plant food.
I have an entire thirty foot long row of bell peppers and I'm tucking hot pepper plants between tomatoes and rows of onions and anywhere else I can find space.
Stephen
Comments
Post a Comment